
STEP 01
Agree a due date before sending
Agree payment timing with your client, then enter the issue date in Invoice Maker. Choose a payment-terms option such as Net 14 or Net 30, or enter a custom due date. The preset calculates from the issue date; changing the issue date can change the calculated due date. Confirm the actual date before sending. Include your invoice number in the payment instructions so the client has a reference to use.
STEP 02
Record the total received so far
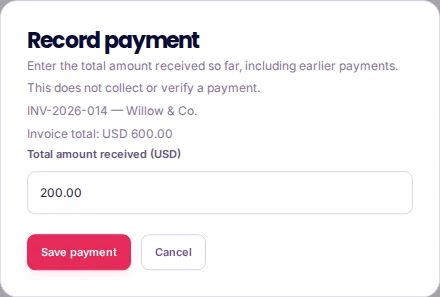
Use Amount paid for the cumulative amount you have actually confirmed, not the amount you hope to receive next. If the invoice total is USD 600.00 and the client has paid USD 200.00, record 200.00 and review the USD 400.00 balance. After another USD 150.00 arrives, update Amount paid to 350.00. Changing a status or downloading a PDF does not charge the client or verify a bank transaction.
STEP 03
Review status and outstanding balances
A new invoice can remain Draft while you prepare it. Mark it Sent after you send it yourself. A positive recorded payment below the total makes it Partially paid; a recorded payment equal to the total makes it Paid. Sent or Partially paid invoices with a due date before the current UTC date appear Overdue. Save account invoices explicitly after changes. These records help you track your work, but they are not a bank feed or a complete accounting ledger.
An example to work from
Invoice total: USD 600.00
First confirmed payment: USD 200.00
Amount paid field: 200.00
Balance: USD 400.00

Another USD 150.00 received:
Amount paid field: 350.00
Balance: USD 250.00
PUT IT INTO PRACTICE
Follow a USD 600 invoice through two payments
- Create a fictional USD 600.00 invoice issued on 3 November 2026. Net 14 gives a due date of 17 November 2026; review and send the PDF through your usual channel, then mark it Sent.
- After confirming USD 200.00 received, enter 200.00 in Amount paid and save. The invoice is Partially paid with USD 400.00 outstanding.
- After confirming another USD 150.00, change Amount paid to 350.00 and save. Once all USD 600.00 is confirmed, record 600.00 and check that the invoice is Paid.
3 November: issued USD 600.00; recorded paid USD 0.00
10 November: recorded paid USD 200.00; balance USD 400.00
14 November: recorded paid USD 350.00; balance USD 250.00
17 November: agreed due date
18 November: if still unpaid in part, the sent invoice is overdue
After final payment: recorded paid USD 600.00; balance USD 0.00
The dates and amounts illustrate the editor’s behaviour. Amount paid is a manually maintained total; Handyfolio does not reconcile transactions, send invoices or establish whether a payment has cleared.
Common mistakes to avoid
- Replacing the cumulative figure with the latest instalment
- Entering 150.00 after receiving 200.00 plus 150.00 understates the amount received. The cumulative figure is 350.00.
- Calling a draft overdue before it has been sent
- Drafts do not become overdue in Handyfolio. Mark an invoice Sent after you have actually sent it.
- Treating the report as a bank statement
- Recorded paid amounts come from your entries. Check them against your actual payment records.
Before you finish
Use the agreed dates and confirmed payments. Check local invoice and tax requirements separately; the tool does not determine them.
- Payment timing is agreed with the client.
- The calculated due date has been checked.
- The invoice reference is clear.
- Amount paid is the confirmed cumulative figure.
- The balance matches the total less payments.
- Status changes and saved records reflect what happened.
Further reading
Official references for the topics covered in this guide.